How to Winterize Your Irrigation System in North Carolina: The 2026 Homeowner’s Guide
North Carolina winters are unpredictable. One week it's 65 degrees and you're contemplating whether to mow the lawn one more time. The next week we're facing a polar plunge and everyone's scrambling to find their winter coats. If you haven't properly winterized “residual water” from your sprinklers, that residual water sitting in your pipes is a ticking time bomb for your entire irrigation system.
Here's what most DIY guides won't tell you: while "draining" your system works fine in states with predictable freezes, North Carolina's clay-heavy soil in the Piedmont and sandy coastal soil in Wilmington create air pockets that trap water. Even if you think you've drained everything, there's almost always water left in the lines. When that water freezes, it expands and cracks your PVC pipes, destroys your valves, and can cost you thousands in spring repairs.
After 15+ years of repairing irrigation systems that homeowners thought they'd winterized correctly, we've learned that proper winterization requires more than just turning off the water and hoping for the best. Let's walk through how to actually protect your system.
When is the Best Time to Winterize in North Carolina?
The timing for winterizing your irrigation system depends significantly on where you live in North Carolina, but the general rule is to complete the process before the first hard frost hits your area.
Mountain regions (Asheville, Boone, Hendersonville): You're looking at mid-October to early November. The mountains see earlier and more frequent freezes, so you can't wait as long as coastal areas. Once nighttime temperatures start consistently dropping into the 30s, it's time.
Piedmont regions (Charlotte, Raleigh, Greensboro): Mid-November is your target window. You typically get a bit more time than the mountains, but not much.
Coastal regions (Wilmington, Outer Banks, Jacksonville): Late November is usually safe, but don't push it past Thanksgiving.
Our recommendation? As soon as nighttime temperatures in your area are consistently dipping below 40, it's time to winterize. Don't wait for the frost warning because by then you're gambling.
Step 1: Locating and Shutting Off the Main Valve
Before you do anything else, you need to find and shut off the main water supply to your irrigation system. This is usually located in one of three places:
Near your water meter (often in a green plastic box in your yard, more common in coastal areas) In your crawlspace (look for a separate line branching off from your main house supply) In a basement utility room (common in mountain homes that have basements)
The valve you're looking for will have a pipe that runs outside toward your irrigation system. It should be clearly separate from your house plumbing. Turn this valve clockwise until it stops. If it's a lever-style ball valve, turn it perpendicular to the pipe.
Pro tip for systems with a master valve: If your irrigation controller has a "Master Valve" setting (check your manual or look for an "MV" terminal on the controller), you need to shut this down electronically as well. If you just shut off the water supply but leave the master valve activated, your pump can run dry when the controller tries to activate zones. This burns out the pump motor, which is an expensive mistake. Either disable the master valve in your controller settings or switch the entire system to "off" mode.
Step 2: Protecting the Backflow Preventer (The Most Expensive Part)
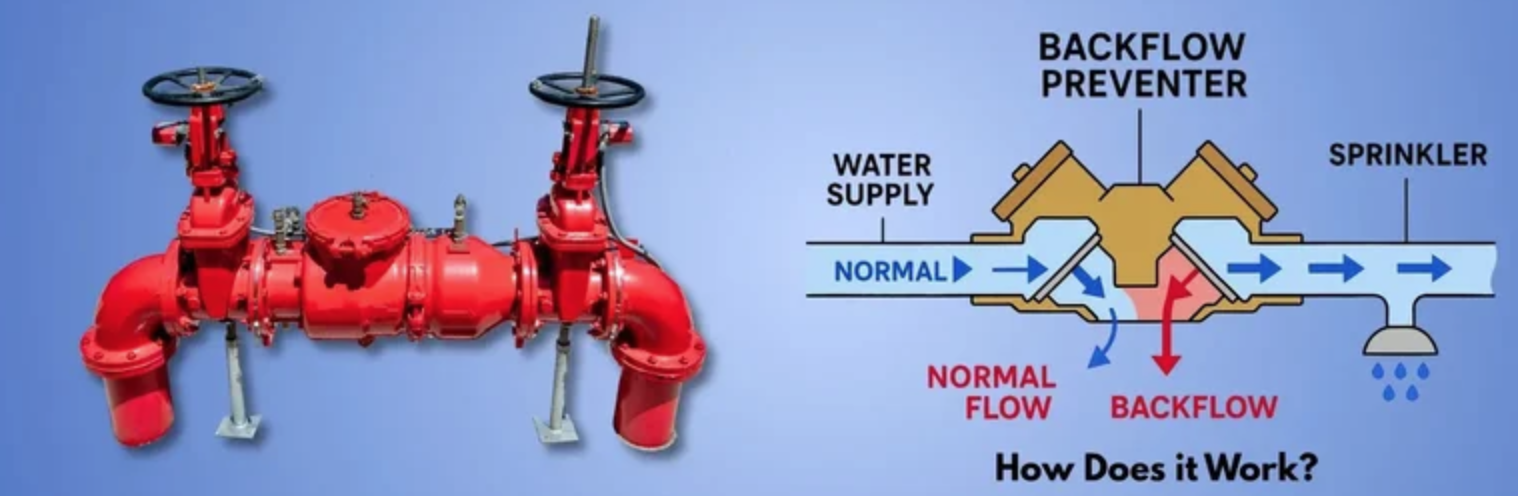
Let's talk about the part of your system that's most likely to get destroyed in a freeze: the backflow preventer. This brass or bronze device (usually mounted on a post or wall above ground) prevents contaminated water from flowing back into your home's drinking water supply. It's also the most exposed, most vulnerable, and most expensive component to replace. We're talking $400-800+ for parts and labor.
The backflow preventer sits above ground because code requires it, but that means it's completely exposed to freezing temperatures. Even a brief freeze can crack the internal check valves and destroy the entire assembly. This is especially critical in the mountains where temperatures can plunge into the single digits.
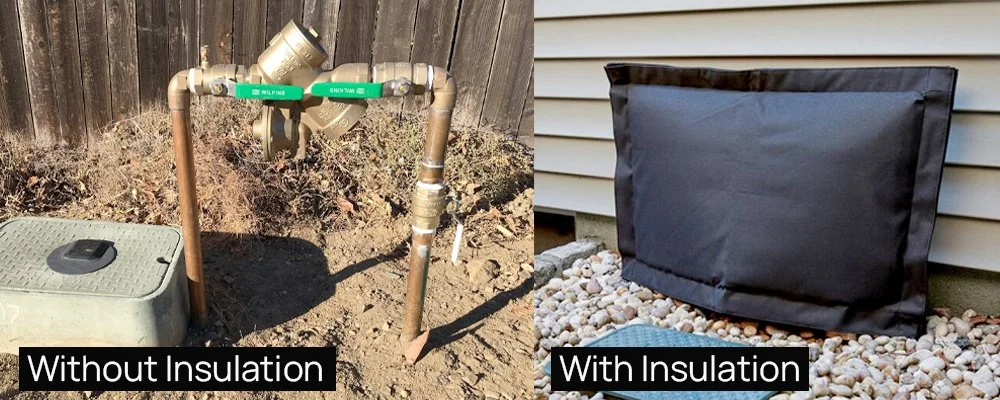
The insulation trap: Here's where most homeowners go wrong. They think wrapping the backflow preventer with an old towel or a plastic garbage bag will protect it. It won't. Towels get wet from rain and then freeze solid against the device, making things worse. Plastic bags offer zero insulation value and just trap moisture.
What actually works? You need a proper insulated "hot box" cover or professional-grade foam insulation specifically designed for backflow preventers. These covers are available at irrigation supply stores (not big box stores usually) and cost $40-80 depending on size. They're worth every penny because one freeze can cost you 10 times that amount in repairs.
If you're serious about protecting your landscape investment (including those carefully selected plants you just installed), proper winterization is non-negotiable. A burst pipe can flood your beds, wash away mulch, and damage root systems when you're scrambling to dig up and repair lines in the spring.
Step 3: The "Blowout" Method vs. Manual Draining
Now we get to the actual water removal, and this is where things get technical. There are two main approaches: manual draining and compressed air blowout. Let's be honest about both.
Manual Draining
Most irrigation systems have manual drain valves at the low points of each zone. These are small valves (often blue or red caps) that you can open to let water drain out by gravity. In theory, you open all the drain valves, and the water flows out. System drained, right?
Wrong. In North Carolina, this method is unreliable regardless of where you live because:
Our terrain across the state isn't perfectly flat, meaning water pools in unexpected places Clay soil in the Piedmont and mountains prevents proper drainage Sandy coastal soil can shift and create unexpected low points Modern systems often have check valves that trap water PVC pipes have slight curves and dips where water collects
You might drain 80-90% of the water, but that remaining 10-20% is enough to cause catastrophic damage when it freezes. We've seen it hundreds of times across both our Asheville and Wilmington locations: homeowner swears they drained everything, spring comes, they turn on the system, and water is shooting out of cracks they didn't know existed.
The Blowout Method
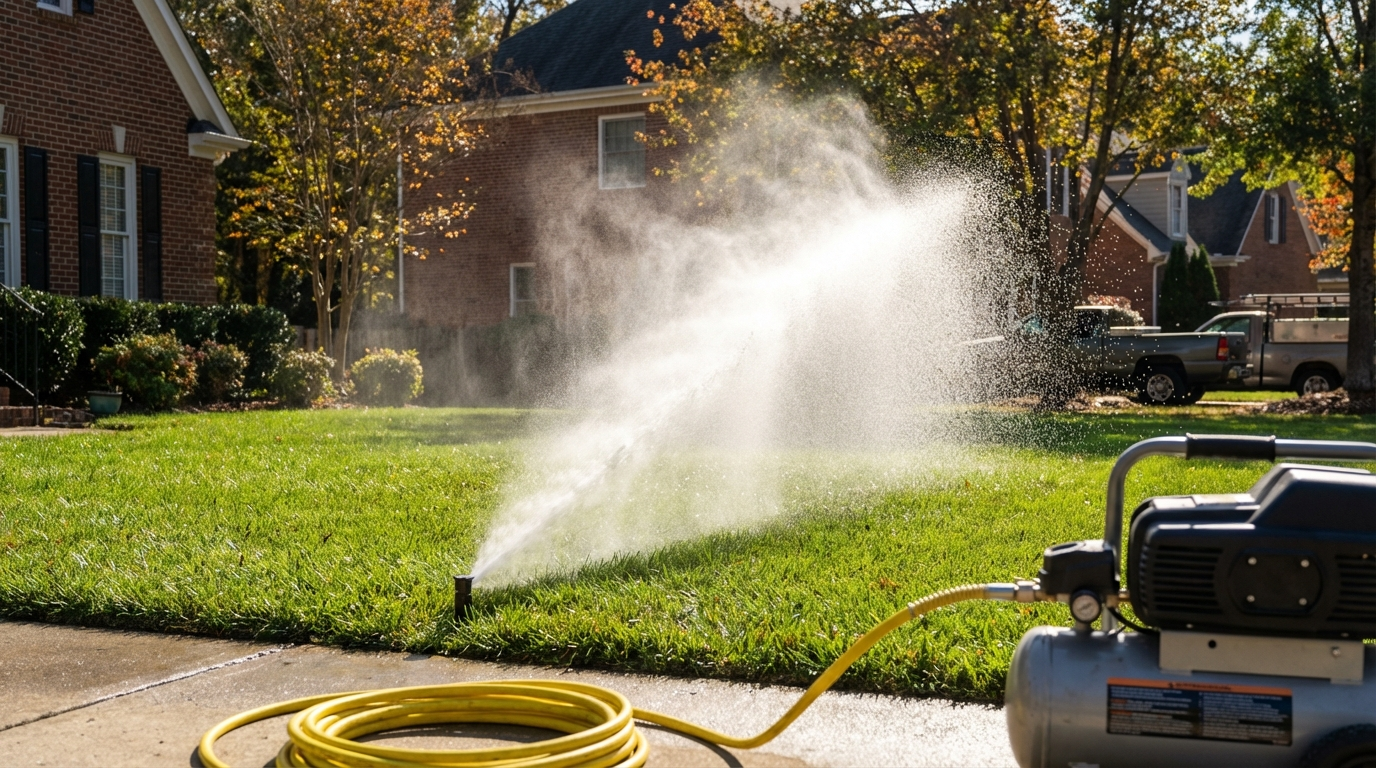
The professional approach is using a high-volume air compressor to blow out every drop of water from the system. This is what we do on every winterization service call at both our locations, and it's the only method that reliably gets 100% of the water out.
Here's how it works: we connect a large air compressor (not the little pancake compressor you have in your garage) to your system's mainline and blow compressed air through each zone sequentially. The air pushes all the water out through the sprinkler heads. You know it's working when you see a mist spray from the heads, then just air.
Critical warning if you're considering DIY: Never exceed 80 PSI when blowing out a residential system. We typically run 60-70 PSI for most systems. Too much pressure will blow out seals, crack fittings, and destroy sprinkler heads. This common mistake causes thousands in damage every year by using compressors that are too powerful or not regulating the pressure properly.
The equipment matters too. You need a compressor that can deliver high volume (measured in CFM, cubic feet per minute), not just high pressure. A small compressor might hit 100+ PSI but only deliver 2-3 CFM, which isn't enough to push water through the lines effectively. Professional irrigation compressors deliver 80+ CFM at controlled pressure. That's why most homeowners can't properly blow out their own systems even if they wanted to.
This is genuinely one of those situations where DIY can cost you more than hiring a professional. The compressor rental alone (if you can even find the right type) will cost almost as much as our service call, and you risk damaging your system if you don't know what you're doing.
Step 4: Preparing the Controller for Spring
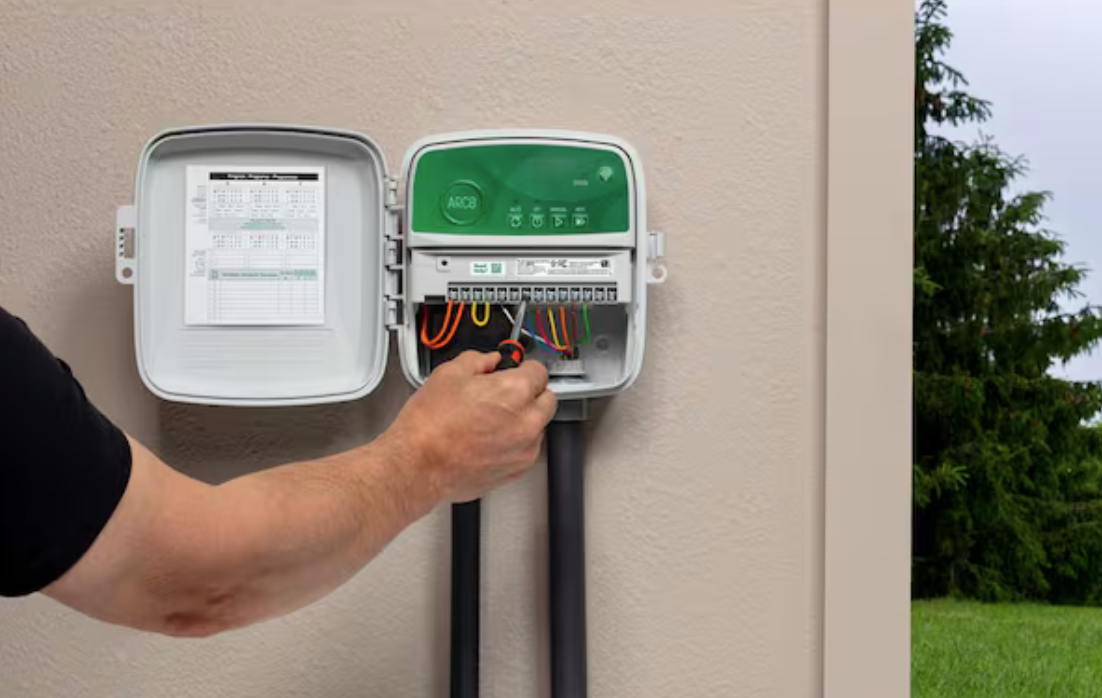
Once the water is out of your lines, you need to deal with your irrigation controller (the box on your garage wall or basement that controls when zones run). A lot of homeowners make the mistake of completely unplugging it for winter. Don't do that.
Why unplugging is a bad idea: Most modern irrigation controllers have an internal battery that maintains the memory for your custom programming (when each zone runs, for how long, which days, etc.). If you unplug the controller, this battery eventually dies over the winter, and you lose all your settings. Come spring, you have to reprogram everything from scratch, which is a pain.
The better approach: Put your controller in "Rain Mode" or switch it to "Off" mode. Both options prevent the controller from trying to run your zones while still keeping power to the unit so the battery stays charged. Your programming stays intact, and in spring, you just switch it back to "Run" mode.
Some newer smart controllers have a "Seasonal Adjustment" feature where you can set the watering to 0% for winter. This is another good option that preserves your settings while ensuring nothing tries to run.
One exception: If you have a really old controller (15+ years old) that doesn't have modern features, you might need to leave it powered but write down all your settings before winter in case the battery dies anyway. Take a photo of every screen with your phone. Future you will be grateful.
The Spring Startup: Why Winterizing Saves You Money
Let's talk about what happens in March or April when it's time to turn your system back on. This is where proper winterization pays for itself.
Properly winterized system: We turn on the main valve, reactivate the controller, test each zone for coverage and leaks. Total time: 20-30 minutes. Total cost: our standard spring startup service call, usually $150+.
System that wasn't winterized (or was done wrong): We turn on the main valve and immediately hear the sound of water spraying somewhere it shouldn't. Now we're digging up the yard to find cracked pipes. Maybe it's one crack at a fitting (best case, $200-300 repair). Maybe it's multiple cracks in the mainline and several zone lines (worst case, $1,500+ to re-pipe sections of the system). Plus you have torn-up landscaping to repair. Getting a professional winterization will save you a headache and money once Spring rolls around.
Schedule Your North Carolina Irrigation Service
Don't risk a burst pipe this winter. Thorpe Landscapes provides professional irrigation blowouts and backflow protection across North Carolina. With locations in both Asheville and Wilmington, we've winterized thousands of systems over the past 15 years, and we know exactly what works in our state's unpredictable climate.
We service both residential and commercial properties. Whether you have a basic 4-zone home system or a complex 20-zone setup with a pump station, we have the equipment and experience to winterize it properly.
Ready to protect your irrigation investment? Contact us for a free assessment today!